Posted
Comments: 13

Alternative Frothers

Our favorite milk foamer/frother is made by a company called Froth Au Lait. Unlike most other automatic frothers that use a small whipping disc, the Froth Au Lait has two large spindles hat really work well. Both quality and volume of foam has been better than other frothers that we have tried.

Our frother recently broke and we tried contacting the company for support or or to buy a new one and just reached the infamous “sorry, this number has been disconnected or is no longer in service.”

Most of their products have been pulled of of Amazon as well. We’ve been in touch with a few other vendors who sell their product and they too are unable to reach the company. Their website is still up, but I fear that the company is not longer around.

Has anyone heard anything about this?

Froth Au Lait

Author
Categories

Comments: 13

Posted
Comments: 5

For those of you that have little ones, you know that throwing away diapers can be quite a stinky problem. Here we put two popular models to the test:

Diaper Dekor Plus Diaper Disposal System

vs.

Munchkin Arm and Hammer Diaper Pail

Diaper Dekor Plus


When we created our baby registry, this is the model that several friends recommended. It was higher on the price-scale at around $50 with replacement bags going for about $16 for a two-pack.

Tossing the dirty work

When you have to throw a diaper away, there is a two door mechanism. First you step on the foot pedal to open the main door. Next, you have a spring loaded trap door that you throw the diaper into. Here you want to be quick because the stink will quickly pounce into the room when this door is open. You can try tossing it throw the door with a sharp throw, but this may also break the unit if you are too rough. Also, if your bag is a tad full then you make get the dreaded stuck door. This means that the door opens and the diaper fits in but just enough to keep the door ajar. While your first instinct will be to evacuate and run for high ground, this just mean the stink will be seeping into the room with violent effectiveness. So, your own option is to suck it up (no literally) and push your hand deep into the open door and smush the diapers down until the door closes. After this, you might want to seek out that higher ground. However, this means that your bag is full and you’ll need to return and empty or else you risk forgetting and repeating this entire process next time.

Loading a new bag

Cut & Tie Style

These bags are the cut & tie style which means that you are really getting one really long bag that goes a long way. Basically, when the device is full, you open it, pull the bag down, cut it (using the installed safety blade, then tie both sides (the top of the old one, and the bottom of the new one).

Diaper Dekor Plus Safety Blade

Once tied, you start filling into the bag where you have just tied the bottom.

Replacing the big long bag


Amazon tends to have them for a slightly lower price. Rated at ~1160 diapers

Every few weeks, you’ll go to tie the bottom of the bag and then pull it down for good measure and the whole thing will just pull out. This is your half bag that you just have to toss unused. It means that you now have to install the new “big long bag.” These run about $8/each and come in a two-pack ($16). When installing a new bag, you open up the entire top of the Decor and then pull out an oval-shaped plastic holder. The lid only open opens up about 45-60 degrees meaning that you have to wiggle the oval-shaped piece out.

Diaper Dekor Bag Replacement

Getting it out is pretty easy, but the challenge is getting it back in. The wiggle motion works fine, but now you have a huge $8 plastic bag around the side. So trying to wiggle it in means that the bag gets caught up and often pulls off and you have to start all over. Also the foot-pedal does not hold this part of the door open nor does the door stay open on its own. So you have to do all of this wiggling with one hand while the other holds the lid open.


These run as low as $20 for a four-pack giving a $5/each price. Rated at around ~1160 diapers

Amazon also sells the eco-friendlier green colored replacements for even less. We used these and found them to work just the same.

Overall aesthetics

The Diaper Dekor Plus is very modern, simple, and sleek. The oval shaped design fits well in the room without looking out of place.

Price

The Diaper Dekor Plus tends to run around $45-60 – which puts it on the higher end.

Our experience

When we started out, we loved the Diaper Dekor Plus. It was clean, easy, and nice.

However, once the stinky diapers came, our experience changed. Whenever we had to dispose of a diaper, the stench would pounce into the room like a cat jumping out of a bag. It was overpowering. So we started using a technique of throwing the tightly coiled diaper as fast we could through the send trap door. It has a strong spring on it, so it would shut quickly. This helped a lot. However, if the bag was just too full for that door to close, then game over. If you are holding your little one and can’t mange to stuff your free arm down the shoot, your room is toast.

The stench was so bad, that we ended up calling Dekor to inquire. They said that he trap door seal must be defective and would send us a new one. We installed the new door and tested again. Unfortunately, the stench was still there – no difference at all.

Changing the bags was not particularly difficult, but it was not easy either. First you’d have to open the door which let out a strange wave of stink. This was odd because this compartment never came in contact with the actual odor-causers. Nevertheless, it still had a strange odor. So you’d pull the bag down, use the safety cutter on the side to cut the bag free. Here is where you can really mess things up. If you cut it too short, you’ll never be able to tie the bag and are now left with a mobile stink bomb that you have to store inside 1 (or 5) other bags in hopes of protecting the odor. So you end up cutting it really long – which means less use of the bags. Still, as soon as you cut it free, you have that pouncing cat of an odor trying to claw it’s way through as you feverishly try to remember how to tie a knot before passing out.

Bottom line is that our room just always had a lingering foul smell. We liked parts of the operation, we loved the aesthetics, and we could have dealt with all the other issues if the smell was reduced. However because it failed in it’s primary operation, we can’t recommend it.

Conclusion: Diaper Dekor Plus

Munchkin Arm and Hammer Diaper Pail


The Munchkin Arm and Hammer Diaper Pail has a difference approach to with a strong focus on odor control. They do this by combining:

  • Arm & Hammer Baking Soda dispenser
  • Unique twist close mechnaism
  • Individual bags with snap closure (vs. cut & tie)

Tossing the dirty work

When you have to throw a diaper away, there is a a single door that opens. You have to push a lock button on the top of the device, and then use your hand to open the lid. The lid opens to reveal two things. First you’ll notice a small capsule at the top with a baking soda holder/dispenser.

Munchkin Arm and Hammer Diaper Pail  Baking Soda Dispenser

Next you’ll notice a blue cyclone looking thing in the center. This is the actual diaper bag that has a swirled twist close mechanism. So odor is kept inside the bag even when the lid is open.

Munchkin Arm and Hammer Diaper Pail Twist

To dispose, you take the rolled up diaper and you push it into this twisted bag and push it in until it’s below the surface. Once done, you reach up and close the lid. Closing the lid activated the twist mechanism again which essentially pulls the dirty diaper down and twists the back shut once again locking in odor. For good measure, the baking soda capsule is also pushed into the center of this twist to both freshen and seal the center.

While we liked the initial convenience of the Dekor’s foot pedal, this process was much more odor free.

Changing the bag


~$16 for a 30-pack which is rated at a total of ~750 diapers.

The Munchkin Arm and Hammer Diaper Pail uses individual bags. This means that when your pail is full, you simple throw away the bag and install a new one. This is in comparison to the cut & tie style of the Dekor.

To dispose of the old bag you first open the lid on the top and then turn the lock and open the panel on the side. On the edges of the twist where you dispose of the diapers, there is a plastic ring with four notches. You pull these out and then fold the ring in half where it clicks shut. Then you push the sealed ring down through the opening. You can then pull the sealed bag out through the side panel for disposal.

Installing a new bag is pretty straightforward. You pull the back through the opening and then open the ring and lock the four notches into place. Getting all four notches in place is a slight challenge but definitely not a deterrent. Once down, you simply close and lock the side panel and then close the top lid which will give the new bag its twist shut seal.

Overall aesthetics

The Munchkin Arm and Hammer Diaper Pail is a very plain looking piece of plastic. It does not have the sleek modern look of the Dekor.

Price

The Munchkin Arm and Hammer Diaper Pail runs just under $30 at Amazon or BuyBuyBaby putting it on the lower-end of the cost scale. Replacement bags run slightly higher than that of the Dekor giving you an estimated 750 diapers for $16 vs. as many as ~2000 for $20 on the Dekor.

Our experience

Our experience thus far with the Munchkin Arm and Hammer Diaper Pail has been very positive. For us, the primary reason that you buy a diaper pail is for odor control. Otherwise you’d just toss the stinks into any trash can.

The Munchkin Arm and Hammer Diaper Pail

Conclusion

The Winner: Munchkin Arm and Hammer Diaper Pail

Odor Control

For odor control, the Munchkin Arm and Hammer Diaper Pail definitely reduces odor compared to the Diaper Dekor Plus.

Use: Disposal

In disposal use, (if you ignore the odor issue for a moment) the Diaper Dekor Plus was a little easier to use. Stepping on a foot pedal and tossing a diaper through the trap door was a breeze. Unless of course the Dekor is full then you have a mounting problem on your hands.

However the Munchkin Arm and Hammer Diaper Pail was also perfectly easy to use and controlled the odor during the process.

Use: Changing Bags

The Munchkin Arm and Hammer Diaper Pail wins here as well. Changing bags was both easy and involved far less odor issues.

We like the more Eco-friendly (and cost effective) long bags of the Diaper Dekor Plus and would put up with the more involved bag changing process if it were not for the odor issues.

Cost

The Diaper Dekor Plus has a larger initial cost but a cheaper ongoing cost. The Munchkin Arm and Hammer Diaper Pail has a lower initial cost, but the bags do cost a bit more. In the end, we give this a draw. On paper, the Diaper Dekor Plus could cost less in the end, but it’s also hard to truly measure the longevity of the bags with the “cut & tie” method.

.h2 Comparison Chart

Feature Diaper Dekor Plus Munchkin Arm and Hammer Diaper Pail
Odor Control Star StarStarStarStar
Ease of Disposal StarStarStarStar StarStarStar
Ease of Bag Change StarStar StarStarStarStarStar
Initial Cost ~$50 ~$30
Bag Replacement Eco 4 Pack Refill Bags, 30 Count
Aesthetics StarStarStarStar StarStarStar
Overall Not Recommended Highly Recommended

Questions / Comments?

If you have any personal experience with these or any questions or suggestions, please let us know.

Author
Categories

Comments: 5

Posted
Comments: 24

Routing all remote traffic through OpenVPN

There’s a great guide on OpenWRT.org that covers most of what I wanted to do. However, I ran into a few snags and figured this might help someone else.

My goal was to do the following:

  1. Set up an OpenVPN running on my DD-WRT/OpenWRT compatible router
  2. Configure a Windows 7/8 laptop to connect to the tunnel for the following reasons:
    • Default route all traffic through the router in hopes of protecting traffic when on public networks
    • Access “local” resource while out on the road

DD-WRT vs. OpenWRT

I’ve tested OpenVPN on a Linksys E2000 running DD-WRT and had good luck with it. I also have a TPLink 4300 which runs DD-WRT, but I had trouble getting SSH to work (the option was greyed out) and ultimately could not get OpenVPN to run. So I decided to try OpenWRT instead. For my needs, I much preferred OpenWRT and the steps here are geared for OpenVPN running on OpenWRT.

OpenWRT

192.168.0.x and 192.168.1.x are very commonly used and could cause some problems when you are connecting to various routers and public networks.

Once you have OpenWRT installed on your router, I suggested that you change the default LAN IPs to be something other than 192.168.1.x. For this tutorial, I have changed the IPs to be 192.168.99.x. So when you see .99. then just replace it with whatever you configured the router to use.

OpenVPN Server Installation and Configurations
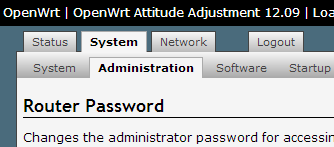
Turn on SSH

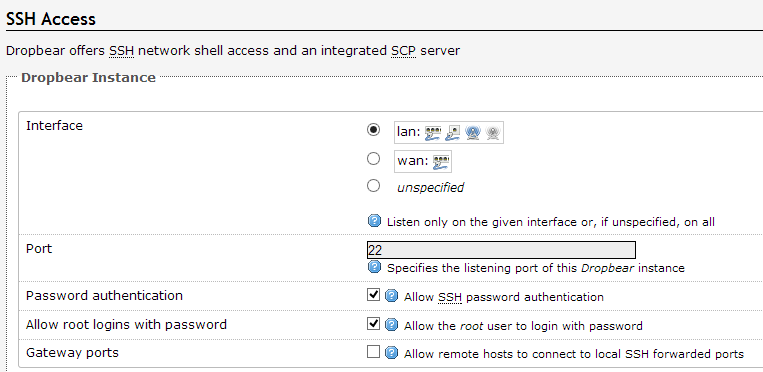
You may need to enable SSH access before you can log in. To do so go to System -> Administration

Open WRT -> System -> Administration

Then scroll down to the section that says SSH Access and make sure the settings are enabled:

Open WRT ---> SSH Acces

Install the OpenVPN and SFTP Packages

SSH into your router by going to 192.168.99.1 using the SSH Port that you set above. The default is 22. Sign in as root and use the password that you have set to sign into your OpenWRT admin website.

Once you are signed in, you can run the following commands. There is no need to change the directory/path that you are in.

This will run a command line update:

opkg update

This will install the OpenVPN and Easy RSA (for generating the keys):

opkg install openvpn openvpn-easy-rsa

This will install SFTP (FTP over SSH) which is useful when you want securely to copy the keys off the server and onto a client:

opkg install openssh-sftp-server

The OpenWRT guide suggested that you can install the GUI package (luci-app-openvpn), but this failed for me using the latest build of OpenWRT saying that the package could not be located. This package is not needed in order to get things working.

Building the Certificates/Keys

Changing defaults (optional)

When generating the keys, you will be prompted for a lot of settings. You can change some of these default values in order to make the prompts easier. That is, you can just press [enter] for the defaults.
So, to help make some of the prompts easier, you can edit this file. Towards the bottom are some of the defaults:

vi /etc/easy-rsa/vars

Get your server/keys ready:

Next run the following:

clean-all
build-ca
build-dh

Next build the server keys:

build-key-server server

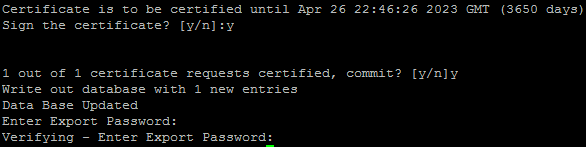
This will give you a lot of prompts. I tried to keep the answers here similar across the server and client keys, though you will need to keep the file names and common-names unique. That is you can’t have two client keys called “user1”

WRT --> SSH --> Build Server Keys

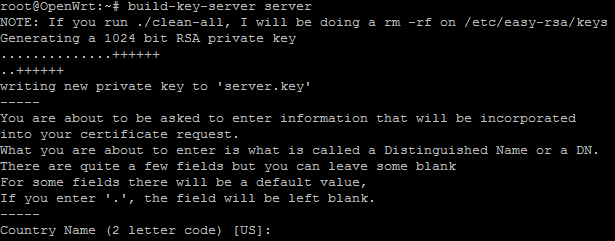
Note, when asked for a challenge password I put a randomly generated one in there. This did not seem to come up anywhere else or cause any problems.

Get your client keys ready:

I used the PCKS12 format. This format combines all the keys you need for the client to connect into one .p12 file. This would be the only file that you would need to ship to each client.

build-key-pkcs12 user1

Note, make sure you keep the Common Name unique. I just left it as user1 to match the file names.

Also, you can put an export password on this .p12 key which means that the client would have to enter this password anytime they connect or use the key. This password is optional and you can choose to leave the export password blank.

WRT --> SSH --> Client Key

Copying the keys over

The keys that you are generating will be stored int he /etc/easy-rsa/keys folder. You will need to copy the server keys over to the /etc/openvpn/ folder for use with OpenVPN:

cd /etc/easy-rsa/keys
cp ca.crt ca.key dh1024.pem server.crt server.key /etc/openvpn/

OpenVPN Server configuration

Edit the OpenVPN Server configuration:

vi /etc/config/openvpn

Replace the server config with the following:

config 'openvpn' 'lan'
        option 'enable' '1'
        option 'port' '1194'
        option 'proto' 'udp'
        option 'dev' 'tap0'
        option 'ca' '/etc/openvpn/ca.crt'
        option 'cert' '/etc/openvpn/server.crt'
        option 'key' '/etc/openvpn/server.key'
        option 'dh' '/etc/openvpn/dh1024.pem'
        option 'ifconfig_pool_persist' '/tmp/ipp.txt'
        option 'keepalive' '10 120'
        option 'comp_lzo' '1'
        option 'persist_key' '1'
        option 'persist_tun' '1'
        option 'status' '/tmp/openvpn-status.log'
        option 'verb' '3'
        option 'server_bridge' '192.168.99.1 255.255.255.0 192.168.99.200 192.168.99.219'
        option 'push' 'redirect-gateway def1'
        list 'push' 'dhcp-option DNS 192.168.99.1'

Notes

  • option ‘push’ ‘redirect-gateway def1’ – will instruct the clients to push all traffic through the router. This is what I wanted as one of my goals was to “encrypt” traffic from the client when connected to public networks. If you leave this option off, your clients will still be connected to the network and have access to local resources, but their default gateway may still be their outside network.
  • list ‘push’ ‘dhcp-option DNS 192.168.99.1’ – will tell the router to push the DNS server (itself) down to the client. I ran into some trouble where the client could not resolve DNS without this command.

Start the server

Start server from Command line

/etc/init.d/openvpn start

If needed, you can also stop or restart the service:

/etc/init.d/openvpn stop
/etc/init.d/openvpn restart

Enable the OpenVPN server so that it automatically startup on boot.

/etc/init.d/openvpn enable

This can also be done via the OpenWRT GUI through System —> Startup and then clicking Enable next to OpenVPN:

WRT --> System --> Startup ---> Enable

Router Network Configuration

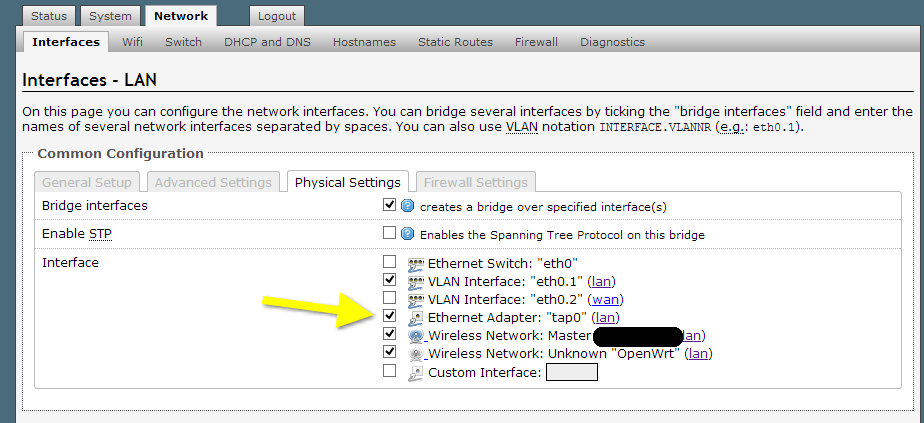
Now that you have your server configured and started, the network/interface should show up and can be bridged. Using the OpenWRT web management, go to WRT —> Network —> Interfaces —> Edit LAN

WRT --> Network --> Interfaces ---> Edit

Then click on Physical Settings and check the box next to the tap0 interface in order to bridge that network. This essentially means that when someone connects to the tap0 (your OpenVPN network), they will have access to the other resources on the LAN, WLAN, etc.

WRT --> Network --> Interfaces --> Edit LAN --> Physical Settings

Firewall and DHCP

Back to the SSH console for the next changes.

Update the firewall to allow Port 1194 UDP traffic.

vi /etc/config/firewall

Add the following to the bottom of this file:

config 'rule'
        option 'target' 'ACCEPT'
        option 'dest_port' '1194'
        option 'src' 'wan'
        option 'proto' 'tcpudp'
        option 'family' 'ipv4'

Restart the iptables based firewall:

/etc/init.d/firewall restart

Next let’s update the DHCP ranges:

Initially I understood the DHCP changes incorrectly. The original configuration had 50 and 200 for the DHCP. I though it meant that the DHCP LAN should start at 50 and run through 200. However the second command limit means that the DHCP would be starting at 50 and run for 200 addresses thus ending at 250. If you remember from our OpenVPN configuration (above), we configured the OpenVPN clients to receive addresses from ~200-220. We don’t want this to overlap, so the settings must be changed to something like the above which says: Start at 50 and run for 150, giving a normal LAN DCHP range of 50-200.

 vi /etc/config/dhcp

Change the LAN section to something like the following:

config 'dhcp' 'lan'
        option 'interface' 'lan'
        option 'ignore' '0'
        option 'start' '50'
        option 'limit' '150'

restart dnsmasq:

/etc/init.d/dnsmasq restart

To review:

  • 50-200: LAN/WLAN address lease range
  • 201-220: OpenVPN address lease range

Connect your clients:

Now that your server is up and running, let’s try connecting one of your clients. You need three things on the client to do this:

  1. Client must have OpenVPN client installed (Download here)
  2. The client configuration file must exist that matches the server and points to the right outside IP of your router
  3. The server key/certificate that we created above (we are using the .p12 format for this tutorial)

Client Config File (.ovpn)

Note, you may need to l launch notepad.exe with administrative privileges in order to write to the above folder. Alternately, you can create it somewhere else and then copy it in (where you will then need to grant admin privileges to copy).

Once you have the OpenVPN client installed, create a configuration file. On my Windows 7/8 instance, this file would exist in

C:\Program Files\OpenVPN\config\

In this path, use notepad.exe (or equivalent) to create a file called OpenWRT.ovpn

In this file put the following:

#Configuration
remote <your.server.address.here> 1194
client
tls-client
dev tap
proto udp
remote-cert-tls server
resolv-retry infinite
nobind
persist-tun
persist-key
pkcs12 user1.p12 
comp-lzo
verb 3

On line 1, make sure you update to your servers outside WAN IP address.

Validating the Server/Keys

WARNING: No server certificate verification method has been enabled. See http://openvpn.net/howto.html#mitm for more info.

remote-cert-tls server – this line is required or else you will receive a warning in the log about MITM attacks. This warning is telling you that if you don’t validate the servers authenticity somehow, then someone could hack/attack your “secure connection” using a man-in-the-middle attack. This line asks your client to authenticate/validate the server keys first and should remove that warning.

Client certificate/key

This is the file that you created back in the SSH session on the OpenWRT. For this tutorial we are using the PKCS12 format which means all the keys are combined into a single file. You’ll need to copy your user1.p12 file from the OpenWRT server to the same path as the client configuration file that we just created (C:\Program Files\OpenVPN\config\).

One of the first steps that we did was to install the SFTP server onto your OpenWRT router. This will allow you to securely login and copy the file out. I used a program called FileZilla to do this.

Once you have the file in the right place, you should be all set to connect.

Connecting for the first time

Run the OpenVPN GUI which will put a little icon into your taksbar that has two red-monitor screens. Right click on this and select “connect”

Note, if you have more than one connection, then you will see them listed here and you would select one of those first, then select connect.

WRT / Client / Connect

When you connect, a status screen will show up that will have a lot of log information. If you have an export password on your .p12 file, then you will see a prompt for that here.

OpenVPN Password

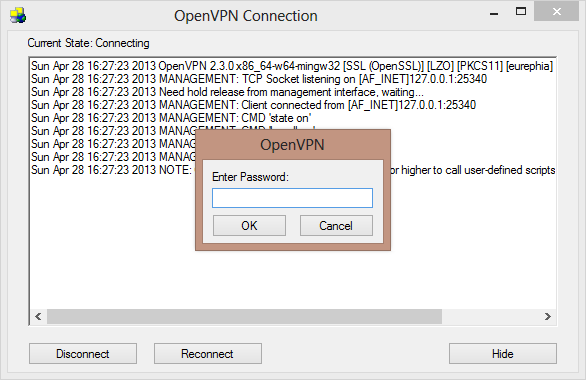
Once you successfully connect, the monitor lights will turn from red to yellow and finally to green and that should mean you are all set.

Testing 1…2…3…

You should be able to connect to the VPN even if you are connected behind the OpenWRT router. However, in order to properly test things out, you should really try connecting from an outside network (coffee shop, etc.).

Once you get the green light on the OpenVPN GUI, try some of the following tests.

Open WRT Management Web

Try to connect to http://192.168.99.1/ (or https://192.168.99.1/ if you have that turned) on. If you successfully see the login screen, then that means your VPN is working and you have access to your local resources. If you disconnect the VPN, you should not longer be able to access the management site.

tracert

First, let’s test this with the VPN connection off. So make sure the OpenVPN lights are red and you are disconnected.

In Windows, open up a command prompt (cmd) and type in:

tracert www.google.com

and then watch the results. You really only care about the first few lines.

You should now see a set of hops showing that you are routing through the network you are connected to (coffee shop, etc.).

Next, connect to your VPN. Once you have green lights and can get online, run the same command again. You want to see something like the following:

Notice that the first hop is your OpenWRT router at 192.168.99.1. The second hop should be whatever network your OpenWRT router uses to connect out. For testing, I had my OpenWRT router behind another network that ran off 192.168.1.254. Note: If you are running behind another router/firewall, you will need to open port 1194 on the “outside” firewall and point it to the OpenWRT’s LAN address on that network. This type of setup may be common for those plugging in behind an “all in one” Cable Modem/Router/Switch.

If you don’t see any difference in the tracert, but can successfully see local resources, that could mean that your VPN is connecting okay but not acting as the secure default route of all our traffic. Ensure that the setting: option ‘push’ ‘redirect-gateway def1’ is properly configured in the OpenVPN configuration file.

“What is my IP” test

As a final test. go to google and type in “what is my ip” and see what address it gives you. This should give you the outbound WAN address of whatever network your OpenWRT is connected. What this means is that when you visit websites, they are “seeing” you as though you are coming from the OpenWRT connected network and not the one you are directly connected to (coffee shop, etc.).

Comments?

Hope this guide sheds some additional light on configuring OpenVPN on an OpenWRT router. If you have any questions or suggestions, please leave them in the comments below.

Author
Categories ,

Comments: 24

Posted
Comments: None

There are likely several possible causes of this, but ours turned out to be a yet-to-be-fixed bug in iPhoto. Hopefully this will help others who have that same bug. You can skip down to the section labeled “Solution” if you want to skip all the background.

For better or worse, iPhoto decided awhile back to combine all of your photos into a single iPhoto Library “package” file. That means that your individual jpg files are no longer directly accessible, but instead are embedded inside of a single photo library. The touted benefits are that it’s easier to manage, and you no longer have to worry about moving files and messing up your library. The downside is that you now have a single large file that can be harder to backup and is more prone to corruption and loss of images. If your single file gets deleted, removed, corrupt, etc. then you run the risk of losing your original photo files in addition to any organization (events) or modifications (red-eye, etc.). If you search the Apple.Support forums, you’ll see that this very problem has struck many users when upgrading to iPhoto ’11.

The Problem

So when we went to upgrade to iPhoto ’11, everything ran smoothly until the progress bar got to around 95%. Then it just sat there, for two days. Nothing. This is a pretty nasty bug. No error is detected, it just locks up and freezes. Eventually we had to force quit. Upon loading the app again, the horror of lost photos began. All of our events were there and seemed intact, but the thumbnails just showed black rounded-edged boxes. When we viewed any photos we just got a strange warning/yield sign. It appeared as though all photos were gone.

Calling Apple Support and following the script

We won’t bore you with all the details of calling Apple Support, but here is the gist of what you might experience:

  • Most reps acted as though this was the first time they had heard of this problem. We found that surprising considering the many forum posts dating back well over a year with mixed solutions.
  • They will ask you to follow a script of six steps to rebuild and recover the photos. This may recover your files, but they will be in random order having lost all events and history of modifications. If you have no backups, then this would at least get your raw photos back. Also, you may notice thousands of extra photos. The support rep at Apple said that when the library gets corrupted and you have to recover, it pulls in every original and every modified photo file as a new file. So this means anytime you cropped, edited, removed red-eye, etc. you will get at least one new photo representing the “modified” file.
  • Parts of this process take a long time. You will likely have to schedule several call-backs and that means re-telling your issue each time to a new service rep and getting a slightly different approach to solving the problem.
  • When you end up with a half-solution (at best), they will ask you to repeat all of this on a backup file – yielding the same results.

Let’s try this again

After all that, we started over. We pulled an archived back-up from Time-Machine. Our last support rep (lucky #7, I think), a Senior Rep, was very helpful. He had us go through a backup iPhoto ’09 Library file and start looking for anomalies or ways to extract and re-import files to preserve events. Unfortunately, we could not solve the problem on that call, so we scheduled another call-back.

However, we decided to try a fix – and it worked.

The Solution

Requirements: You mush have a backup file that has not already failed the update and that has not gone through a rebuild and recover process.

Before trying anything (here or elsewhere), make sure that you back up your files. Also make sure that your backups are working. We had issues with both Time Machine and Chronosync successfully backing up our iPhoto Library – even though it appeared to be working. Luckily we were able to find/use a back up that was only a few weeks old.

First, locate your “old” iPhoto Library (not one that has already failed the upgrade or gone through the rebuild/recover). Find it in Finder, right-click and choose Show Package Contents

Click through folders such as Originals, Masters, Modified, etc. and look at all the folders. You should see several folders with a Date/year such as:

  • 2003
  • 2004
  • 2005
  • etc.

That represent the years of the files inside them. Look for any files that have a very strange date. We had one that was 1970 (strange, but did not cause any problems). Then we found the culprit. We had a folder with the year 4674 and something that appeared like:

“Mar 10, 4674” where did that come from? Had we found the new Mayan Calendar hidden inside iPhoto?

Inside this folder were normal looking files. Some had valid dates, while others had dates of year 2038. None had a date of anywhere near 4674. Clearly this was some hiccup or bug in iPhoto ’09 (or prior) that created this file.

So we simple pull this entire folder out and moved it to a back up on the desktop. This way we still had the photos/movies but could pull it out of the iPhoto ’09 library. If you see such folders, just make sure you scan through and pull them out of all the folders.

Next, we copied this modified iPhoto ’09 folder into our users folder and launched iPhoto. If you find yourself having multiple iPhoto libraries on the computer, you can hold down the Control key and it should prompt you to select which one you want to open.

We opened the newly fixed iPhoto ’09 file and it gave us the “You need to upgrade your library” message. We clicked okay and it was zoomed through and finished within the hour. We now had most our photos and events back and in working order (minus the strange year 4674 photos that we could re-import from our desktop)

Clearly something went wrong with iPhoto ’09 when it created this futuristic folder, but it’s shocking that iPhoto ’11 would completely hang and crash upon seeing these files.

Again there seems to be several issues with the iPhoto 11 update, but hopefully this helps someone.

Author
Categories

Comments: None

Posted
Comments: None

Starting/Overview

A lot of site give you hints of how to install TrueCrypt on a Raspberry Pi, but I could not find any that took me step-by-step or that worked on Fedora Remix. So here is an attempt to do that. I’m not an expert on these commands, but hope that organizing things here helps others.

After trying some methods which suggested/required building wxWidgets that eventually lead to errors when building TrueCrypt, I decided to try another approach – which is much more straightforward.

Notes worth reading

  • This was done on a clean install of Fedora Remix 17 for Rasberry Pi. Please note, some of the libraries installed (gcc, etc.) may already be on your system if you have installed other programs or have a different configuration or build.
  • I ran this though an SSH session. I tried as well on the terminal in the GUI, but things seemed to run noticeably slower.
  • During all of this, I received a few messages like: note: the mangling of âva_listâ has changed in GCC 4.4 Not sure these have any adverse meaning.
  • To keep things simple, I just signed in as root and created a folder called tc in my home folder. So when you see any reference to /root/tc/... that could be replaced with your own location. You might install it as /home/pi/ — However, it’s important to note that some of these commands are run as sudo. There may be reasons you don’t want to do this as root.

Let’s Start

Starting here:

pwd
/root/tc/

Stuff you need, but might not have

Note: If you want, you could combine these into one yum command.

Install gcc

sudo yum install gcc

This is where you get g++ (it’s not yum install g++ like it is on apt-get):

sudo yum install gcc-c++
sudo yum install gtk+
sudo yum install gtk+-devel gtk2-devel

These files are needed, supposedly, to build TrueCrypt

sudo yum install fuse fuse-devel

wxWidgets

Unlike trying to configure/compile, simply yum them :

sudo yum install wxGTK wxGTK-devel

much easier

PKCS

mkdir pkcs11
cd pkcs11
wget ftp://ftp.rsasecurity.com/pub/pkcs/pkcs-11/v2-20/*.h
export PKCS11_INC=/root/tc/pkcs11/

Make TrueCrypt

Downloading the TrueCrypt Source

This part is a little bit tough. Go to http://www.truecrypt.org/downloads2 and download the “Mac OS X / Linux (.tar.gz)” version of Truecrypt. The challenge here is that they require you “acknowledge license” so I don’t think you can do a direct wget. So you may need to find some method to get the file to your Raspberry Pi. I was in the command line and so I ended up using DropBox to create a link that would work with wget.

The file, once done should be something like truecrypt-7.1a-source.tar.gz then you just unzip and un-tar the file

gzip -d truecrypt-7.1a-source.tar.gz
tar -xf truecrypt-7.1a-source.tar

Make TrueCrypt

Go to the folder you un-tar’d a few steps back

cd truecrypt-7.1a-source

Now we build/make something. This takes a little while.

make

if you receive a PKCS11 file not found type of error, just make sure you run this:

export PKCS11_INC=/root/tc/pkcs11/

then try again:

make

The whole make process can take a little while (an hour or more). If all goes well, you should end with something like:

Compiling VolumeFormatOptionsWizardPage.cpp
Compiling VolumeLocationWizardPage.cpp
Compiling VolumePasswordWizardPage.cpp
Compiling VolumeSizeWizardPage.cpp
Compiling WizardFrame.cpp
Linking truecrypt

Where is TrueCrypt?

In the folder that you ran the make command, you need to copy the following file to a better place Main/truecrypt so I did something like this:

cd/root/tc/
cp /root/tc/truecrypt-7.1a-source/Main/truecrypt .

I know have a file in my /root/tc/ folder called “truecrypt” and you should be able to get a list of commands using

./truecrypt

You can now move this file to /usr/bin/ or somewhere else depending on your needs.

Using TrueCrypt

We should now have a working build of TrueCrypt. This works on the command line, but I don’t think it runs on the GUI, but have not tested.

Let’s create a test file conatiner:

./truecrypt --create test.tc

This will take you through all the prompts to create your container. Next you will want to mount the container.

./truecrypt test.tc

On my system this caused the container to exist here: /media/truecrypt1/

Hope this helps!

Special thanks to:

Reinhard Seiler
Thomas Loughlin
Ken Fallon
RaspberryPi.org

Author
Categories

Comments: None

← Older Newer →